Did you know that you can add the Employee Notes icon to cases' Employee Toolbar in HR Case Management?
Many employment-related details are employee-specific. The more agents know about employees, the better they can serve their cases.
Adding the Employee Notes icon to cases' Employee Toolbar helps agents access such details easily.

What are Employee Notes?
Employee Notes are HR-related information items about employees. Unlike Case Notes, Employee Notes do not specifically correspond with any particular case. However, Employee Notes can be useful for resolving employees' cases quickly and accurately.


Where are Employee Notes?
Wherever the Employee Notes icon appears, clicking on it opens the Employee Notes window with a list of all notes in the employee's profile.
In HR Case Management's default configuration, the Employee Notes icon appears:
- In the Agent Queue (list of cases)
The Employee Notes icon appears on the left-hand side of the case number.


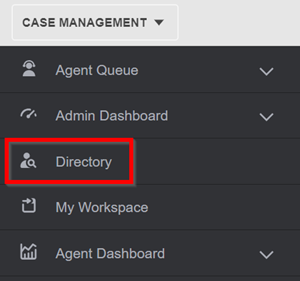
- In the Directory (list of employees)
After searching for and selecting the employee's profile, Employee Notes appear in the right-hand panel.

The Employee Notes icon does not appear within individual cases on the Employee Toolbar by default. The Case Management administrator must configure this setting.
Advantages
The benefits of adding the Employee Notes icon to cases' Employee Toolbar include:
Prominence
While busy agents might overlook the Employee Note icon in the case queue, they are less likely to miss it when it appears in the case.
Quality
Agents serve employees' cases best when they have immediate access to all Employee Notes that could be important to the case.
Simplicity
The need to toggle between the case form and the case queue to view Employee Notes is eliminated.
Precision
The Employee Notes icon reminds agents to consider Employee Notes when formulating the best solution for the case; precise solutions prevent re-opened cases.
Relevancy
The agent can update Employee Notes in the employee's profile without leaving the case. There is no need to locate the employee's profile in the Directory to modify them. Today's agents can keep employee information current for tomorrow's agents.
Scenario
An employee submits a case asking how many hours of Paid Time Off (PTO) will accrue by the end of the year.
While examining the case, the busy agent sees an Employee Notes icon in the Employee Toolbar and clicks on it.
An Employee Note states that the employee has been on Short Term Disability (STD) leave for the past six weeks and is due to return to work in two weeks. The organization's policy does not allow PTO to accrue during leaves of absence.
The agent uses this information to calculate the employee's current and future PTO correctly, responds to the employee, and closes the case.
Adding the Employee Notes Icon to Cases' Employee Toolbar: Steps
1. Log into the Knowledgebase portal’s live site as an HR Case Management administrator user.
2. In the Administration menu, select Case Management Admin.
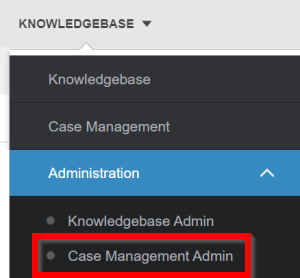
3. In the Case Management Admin menu, select Populations.

4. On the Population page, select a Population. The Properties panel appears on the right.

5. On the Properties panel, scroll down to the Employee Notes area. Click on the "Hide on Employee Toolbar" switch to set it to No. Then click Update.

A confirmation message appears: "Successful - Population has been updated."

6. In the Agent Queue, click on any case with an Employee Notes icon on the left side of the case number.
The Employee Notes icon appears in the Employee Toolbar.
Configuring Employee Notes Editing Rights: Steps
For each population, HR Case Management administrators can grant the ability to edit Employee Notes to any service user role: Agent/ServiceRep, ServiceMgr, and ServiceAdmin.
1. Log into the Knowledgebase portal’s live site as an HR Case Management administrator user.
2. In the Administration menu, select Case Management Admin.
3. In the Case Management Admin menu, select Populations.
4. On the Populations page, select a population, then click Privileges.
5. On the Privileges panel, under Employee Notes editing, click each service user role switch to set it to Yes, then click Update.

A confirmation message appears: "Successful - Population has been updated."
For questions or more information, contact your HRSD Advisor (Customer Success Manager (CSM)).
