Did you know that you can add the Case Search feature to the Agent Queue in HR Case Management?
With the Case Search feature, users can locate and open a specific case in three steps.
Without the Case Search feature, it can take users up to eight steps to find a case.


Method 1: Directory - Five Steps
1. In the Case Management menu, click Directory.

2. On the Directory page, in the Result area, click the Search by Case button.

3. The Search by Case window appears. In the Case No field, enter the case number, then click Search.

4. In the Result area, the name of the employee associated with the case appears.
In the Active, Regarding, or Archived column, click the case count to view all cases in the category that are associated with the employee.

5. My Workspace appears with the list of cases associated with the employee as per the Active, Regarding, or Archived category. Click on the desired case number.

The case appears in My Workspace.
Note:
If a case is secured, its details appear only to members of the Service Group currently assigned to the case.

Method 2: Agent Queue Reports - Up to Eight Steps
1. In the Case Management menu, click Agent Queue.

2. In the Agent Queue menu, select a case report:
- My Cases
- Unassigned Cases
- Escalated Cases
- Service Group Cases
- My Cases & Unassigned Cases

3. In the report's case list, refer to the Case No. column to locate the desired case's number.
If the case does not appear in a report, refer to other reports.

4. Click on the desired case's number. The case appears in My Workspace.

Method 3: Case Search - Three Steps
1. In the Case Management menu, click Agent Queue.

2. In the Agent Queue menu, select Case Search.

3. On the Case Search page, use either the Case Search field or the Subject Contains field.
Case No. field: enter the exact case number, then click Search.

The case appears in My Workspace.

The "Case not found or access not allowed" warning message will appear if:
- An invalid case number is entered
- The agent does not have permissions to view the case
- The case's status is not Open or Closed, e.g., Secured and Archived cases are excluded from Case Search.
Click OK to acknowledge the message, then run another case search.

Subject Contains field: enter any text to identify a subject, then click Search.

The list of matching cases appears. Click on a case number to open it in My Workspace.

Adding the Case Search Feature to the Agent Queue: Steps
1. Log into the Knowledgebase portal’s live site as an HR Case Management administrator user.
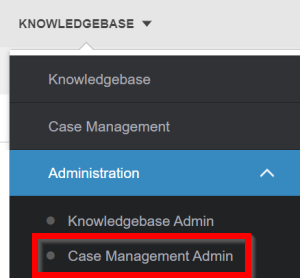
2. In the Administration menu, select Case Management Admin.

3. In the Case Management Admin menu, select Application Settings.

4. On the Applications Settings page, scroll down to the Additional area and click the Case Search switch to set it to Yes. Then click Update.

A confirmation message appears: "Successful - Population has been updated."

For questions or more information, contact your HRSD Advisor (Customer Success Manager (CSM)).