Did you know that you can configure the Add Attachments pop-up’s Upload button label in HR Case Management?
Employees and agents can add files to new and existing cases via the Add Attachments pop-up.
After navigating to and selecting one or more files, the user clicks the Upload button to attach the file to the case.
Case Management administrators can replace this button’s “Upload” label (text) with up to 20 characters. For example, the “Upload” button’s label now reads, “Attach File(s).”


Benefits
Case Management administrators can make the task of adding attachments clearer to agents by customizing the Upload button label.
Navigating to and selecting a file only adds it to the Add Attachments window, not the case. The Upload button’s customized label—e.g., “Attach File(s)”—reminds new users to attach the file to the case.
About File Attachments
Users can upload the following file types to cases as attachments:
- .doc
- .docx
- .eml
- .gif
- .jpeg
- .jpg
- .msg
- .ppt
- .pdf
- .png
- .pptx
- .rtf
- .tif
- .txt
- .xls
- .xlsx
Adding a File Attachment to a Case
Step 1:
In the new case, in the Notes & Attachments area, click + Add.

In the existing case, on the Notes & Attachments tab, click + Add, then select Attachments.

Step 2:
The Add Attachments window appears.
- In the File field, click the file icon.

- Navigate to the file and click on its name to select it.
- The attachment's file name appears in the File field and the Title field. In the Title field, replace the file name with a title for the file (optional).
The file attachment confirmation message appears as per the case type: new or existing.


Configuring the Upload Button Label: Steps
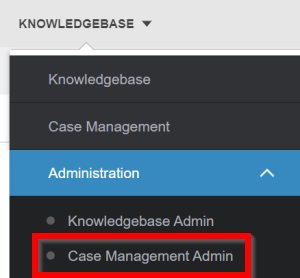
1. Log into the Knowledgebase portal’s live site as an HR Case Management administrator user.
2. In the Administration menu, select Case Management Admin.
3. In the Case Management Admin menu, select Application Settings.

4. On the Application Settings page, scroll down to the Control Labels area. In the Upload Button field, enter text. The limit is 20 characters, including spaces and punctuation. Then click Update.

A confirmation message appears: "Confirmation: Configuration updated successfully."

For questions or more information, contact your HRSD Advisor (Customer Success Manager (CSM)).
