Did you know the procedure for adding links to a content page’s content area in the Knowledgebase Content Management (KCM) system?

Customers can add links to HR Knowledgebase content pages via the Knowledgebase Content Manager (KCM).
About Content Pages
Content pages typically feature information about policies and procedures. They are generally associated with a landing page.
The default content page includes:
• One section which contains:
• One topic; and
• One content area within in the topic
• Bottom content area
• The left-hand side bar (optional)
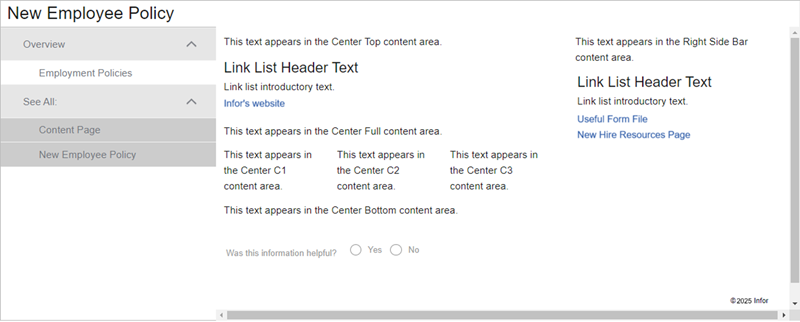
About Content Areas
Content areas define the content page’s layout. Multiple content areas can be added to—and deleted from—a content page’s topic.
The content area does not include the left-hand sidebar.
Content area types include:
• Center Top
• Center Full
• Center C1 [column 1]
• Center C2 [column 2]
• Center C3 [column 3]
• Center Bottom
Content areas can include:
• Formatted text
• Images
• A link list with links to other documents on the HR Knowledgebase site and other websites; header text and introductory text for the link list are optional.
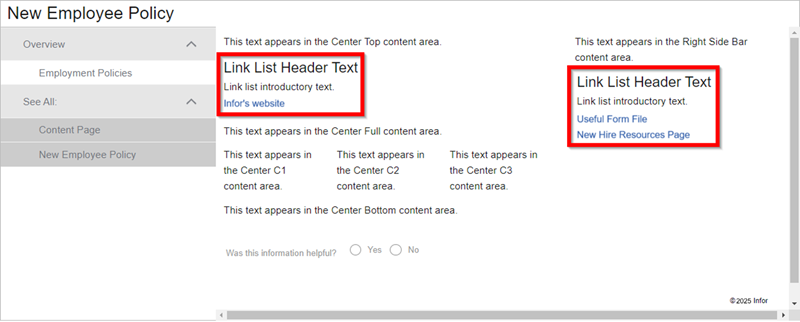
Adding Links to Content Pages’ Content Areas: Steps
To add links to a content area on a content page, first add a link list, then add links to the link list.
Note:
This procedure is not to be used for adding links to documents that will appear under the “Find a Form” header or the “Related Links” header on the content page’s left-hand sidebar.
1. Ensure that the content area is not in Edit mode (the text formatting buttons do not appear).
Mouse-hover over the text in the content area, right click, then left-click Add Linklist.
2. The Add Linklist pop-up appears. On the Properties tab:
• To add header text to the link list, in the Header field, enter text (optional).
• To add introductory text to the link list (under the header, if any), in the Text field, enter text (optional).
• Click Save.
3. In the content area, mouse-hover over the link-list, right-click, then select Add Link.
Ensure that the content area is not in Edit mode (the text formatting buttons should not appear).
4. The Add Link pop-up appears. On the Details tab, in the right-hand panel under Select Link Type, click a radio button:
• Topic:
Link to a topic in this document (if the document has multiple topics).
• Document:
Link to another document on the KB site (upload, integration, page).
One can add a link to a specific topic of a multi-topic content page.
Document links are filtered; they only appear to users with the same groups as the linked document.
• URL:
Link to an outside website, server, or application. URL links are not filtered.
• Intuitive Link Builder – do not use
5. In the Add Link pop-up appears, on the Details tab, in the left-hand panel:
• If the URL link type was selected, or the link needs a custom name, in the Custom Name field, enter text.
• If the link should open in a new window/tab—best for URLs, uploads, and integrations—in the Target field, enter _blank. (Do not add quotation marks.)
• Click Next.
6. In the Add Link pop-up:
• For a Topic link, tick the desired topic’s check box, then click Save.
• For a Document link, use the Search fields to locate the desired document, tick its check box, then click Save.
• For a URL link, in the URL field, enter the URL. Include https:// or http:// as appropriate. Then click Save.
7. In the content area’s upper left, click the Save Contents button.
Useful Documents
V11 KCM: Adding Links to Content Pages’ Content Areas
This document includes screenshots in the step-by-step instructions for adding links to content pages’ content areas via the Knowledgebase Content Manager (KCM).
V11 KCM: Creating a Content Page
Follow this procedure to create a content page via the Knowledgebase Content Manager (KCM).
For questions or more information, contact your HRSD Advisor (Customer Success Manager (CSM)).
Please Send Your Feedback!
We encourage you to comment on this post—and any of the other posts on the HRSD Community that apply to you.
Your feedback helps us to improve our products and add enhancements to make them as useful to you and your employees as possible.
Thank you in advance!
