How to Fill-out Course Event Import Template – Scenario 1
In this guide we will go through the process of filling out the Course Event Import template that was discussed in the previous guide located here.
Our scenario will have the following requirements:
- A new course will be created in the LMS
- It will be placed on a specific Level along with the events
- 3 Classroom events will be created at once, each containing 1 session.
- The Events will be set to allow users to Self-Register but not Self-Cancel
- Each event will have a different Max Enrollment, Instructors, and Room
- Registration Deadlines will be set for 2 of the 3 events.
A word document and sample XLS file is attached.
Course Information
Course name: Infor LMS Import Training
Short name: ImportTRN
Course Unique ID: INFOR-LMS-IMPORT-TRAINING
Course Credit: 2
Active: Yes
Duration: 2 Hours
Level Unique ID that the course and event will be placed: INFOR
Event Information
Event 1
Special scenario – We do not know the Instructor at this time, but would like to add TBD in the instructor area. In addition, this facility/room isn’t configured in the LMS, but we will want to inform the users of the location. In these scenarios we will not include Descriptions, objectives, and audience.
Event Name: May 31 – 10 AM Session
Event type: Classroom
Timezone: Eastern Standard Time
Date and time the event will Occur: May 31st 10AM – 12PM EST
How many minutes will the session be? 120
Instructor: To be determined (Ad-hoc)
Facility/Room: Room 1234 ( Ad-hoc)
Min Enrollment: no
Max Enrollment: 10
Waitlist: Unlimited
Registration Start Date: May 10th 2021
Registration End Date: May 21st 2021
Cancellation dates: None – will not be allowed to be cancelled by user
Course Default? No, we do not want all users on the level to be assigned to the course.
Self-register? Yes
Approval Required by manager? No
Self-Cancellation? No
Event 2
Special scenario – We have an instructor in the LMS which we will link to the event. We also have a facility Room that was configured in the LMS. In these scenarios we will not include Descriptions, objectives, and audience.
Event Name: June 18 – 12 PM Session
Event type: Classroom
Timezone: Eastern Standard Time
Date and time the event will Occur: June 18th 12PM – 2PM EST
How many minutes will the session be? 120
Instructor: LMS Admin
Instructor UserID: 1
Facility/Room: Facility A Room 4
Room ID: 23
Min Enrollment: 5
Max Enrollment: 30
Max Waitlist: 10
Registration Start Date: June 4th 2021
Registration End Date: June 11th 2021
Cancellation dates: None – will not be allowed to be cancelled by user
Course Default? No, we do not want all users on the level to be assigned to the course.
Self-register? Yes
Approval Required by manager? No
Self-Cancellation? No
Event 3
Special scenario – We do not know the Instructor at this time and want this field omitted. In addition, this classroom course will be a virtual event which will be configured later, but we will want to inform the users of the location. This event will not have a registration deadline. In these scenarios we will not include Descriptions, objectives, and audience.
Event Name: July 14 – 4 PM Virtual Session
Event type: Classroom
Timezone: Eastern Standard Time
Date and time the event will Occur: July 14th 4PM to 6PM EST
How many minutes will the session be? 120
Instructor: N/A
Facility/Room: Virtual
Min Enrollment: no
Max Enrollment: 100
Waitlist: Unlimited
Registration Start Date: N/A
Registration End Date: N/A
Cancellation dates: None – will not be allowed to be cancelled by user
Course Default? No, we do not want all users on the level to be assigned to the course.
Self-register? Yes
Approval Required by manager? No
Self-Cancellation? No
Filling out the Course Information in the Template(Green Columns A-J)
- Since we have our course information we can place the information into the template.
- Go through columns A through J and place the information into the Appropriate Columns.
- For the Active column, place 1 for Active or 0 for Inactive.

- Please note – If you are copying and pasting information use the paste plain text to remove any potential format codes.
- We can now proceed to the Event sections.
Don’t I need to add the same items to the next rows if I will have 3 events?
- If you have multiple rows with the same course ID(Column A) the utility will display an error. The utility processes all the events after the first Course Information has been filled out underneath it, until it reaches a new row with a different Course ID. I will show this in the next section.
Filling out the Event 1 Information for the course in the Template ( Yellow and Gray Columns K – AV)
- For the First row where we have our course information, we can place the information for the first event and the settings for the event as well.
- Since we are adding an Event to the LMS, rather than updating and Existing one, we will be omitting the Event ID column.
- See below for how data was entered into the Template for Event 1
 |
Event Name was added to column L. Since we are not using an Event template, nor is the course/event a CCCE course we omitted Columns M-P
|
 |
Since this is not a SCORM/AICC course/event we omitted columns Q-S.
Column T, or the Is Classroom Portion was given the value of ‘1’ as it is a classroom course event.
In this example we are not using Column U and V as this is a simple single session event. The Classroom date and time will be placed in a different area(Column Z and AA)
|
 |
Since this event is taking place in the EST, we will select Eastern time from the dropdown in the W column. Column X will become populated with the choice made in W.
Since this is a simple single session event, we will omit Column Y.
|
 |
For column Z, or List of Single sessions, we have placed in the date and the Start time in the following Format M/D/YYYY HH:MMTT. As the Session is taking place on May 31st at 10:00 AM, this means the value added to the column for this event is 5/31/2021 10:00AM.
For Duration(AA), we have placed the value of 120 since the duration of the session will be 2 hours.
For the First instructor column(AB), we have omitted the information as we do not know the Instructor however we will add a “TBD” in the next column(AC) to place a text value
|
 |
For the Facility Room ID, we have left it blank as it was noted that the Room is not configured within the LMS. Since we still want to provide information about the room location we can add text to column AE, or Adhoc Facility Room.
Min enrollment has been left blank per the event session requirements.
Max Enrollment has been set to 10
Max Waitlist Users is left blank to signify there is no Max for the waitlist.
|
 |
Registration Start and End Date, Column AI and AJ respectively, has been configured using m/d/yyyy. In this case we used 5/10/2021 for the first day a user can self register into the event session as well as the last day of 5/21/2021
|
 |
If we were to utilize the Course Event Import utility on the same level we are adding the course and event to, we could have omitted column AN. For this example however, we are adding the Unique Level ID.
Make Course Default(AO) – We have omitted. Alternatively you can add 0 to this column. Leaving this blank or using 0, will cause the System to not default the course. Defaulting a course would ASSIGN the course to ALL users on the configured level. USE WITH CAUTION!
Make Event Default- This has been omitted for 2 reasons. First, the event session was specified to not be defaulted. Second, Classroom events cannot be defaulted.
Self-Registration Available has been configured utilizing 1. This will signify that the event will allow users to self-register into the event/course.
|
 |
Columns AR-AV have been omitted due to Course Event requirements. Alternatively the value of 0 can be used.
|
Filling out the Event 2 and 3 Information for the course in the Template
Filling out the Event 2 and 3 Information for the course in the Template
1. Now that we have added information for the first event, we can proceed with adding information for the other 2 events for the same course.
2. To start, we will go to the next row under the course.
3. Do not added information to columns A-J, also referred to as the course columns. The utility will process the additional Events under the Course ID and enter the events to the previous course row. This will occur until the utility reads another Row with a different Course ID that is different from the previous processed course.
a. Adding the same Course ID to another row will result in an Error within the Validation step of the Utility.
4. An example of how the Import File will look like for a Course with multiple events is below.

5. Lets see how we fill out the template for Event 2 and Event 3.
Event 2
 |
Event Name was added to column L under the first event we added earlier. Since we are not using an Event template, nor is the course/event a CCCE course we omitted Columns M-P
|
 |
Since this is not a SCORM/AICC course/event we omitted columns Q-S.
Column T, or the Is Classroom Portion was given the value of ‘1’ as it is a classroom course event.
In this example we are not using Column U and V as this is a simple single session event. The Classroom date and time will be placed in a different area (Column Z and AA)
|
 |
Since this event is taking place in the EST, we will select Eastern time from the dropdown in the W column. Column X will become populated with the choice made in W.
Since this is a simple single session event, we will omit Column Y.
|
 |
For column Z, or List of Single sessions, we have placed in the date and the Start time in the following Format M/D/YYYY HH:MMTT. As the Session is taking place on June 18th at 12:00 PM, this means the value added to the column for this event is 6/18/2021 12:00PM.
For Duration(AA), we have placed the value of 120 since the duration of the session will be 2 hours.
For the First instructor column(AB), we added the UserID of an Instructor that is in the LMS. If you have an instructor present in the LMS and want to link them to the course event Use the AB Column. Utilizing the AC Column(Adhoc Instructor) will not link the Instructor to the Course Event but just place text.
|
 |
For the Facility Room ID, we have placed the ID of the room that was configured in the LMS.
For column AE, or Adhoc Facility Room, we can leave it blank.
Min enrollment has been set to 5.
Max Enrollment has been set to 30
Max Waitlist Users was set to 10. This means that if the session is full, it will add a max of 10 users to the waitlist.
|
 |
Registration Start and End Date, Column AI and AJ respectively, has been configured using m/d/yyyy. In this case we used 6/4/2021 for the first day a user can self register into the event session as well as the last day of 6/11/2021
|
 |
If we were to utilize the Course Event Import utility on the same level we are adding the course and event to, we could have omitted column AN. For this example however, we are adding the Unique Level ID.
Make Course Default(AO) – We have omitted. Alternatively you can add 0 to this column. Leaving this blank or using 0, will cause the System to not default the course. Defaulting a course would ASSIGN the course to ALL users on the configured level. USE WITH CAUTION!
Make Event Default- This has been omitted for 2 reasons. First, the event session was specified to not be defaulted. Second, Classroom events cannot be defaulted.
Self-Registration Available has been configured utilizing 1. This will signify that the event will allow users to self-register into the event/course.
|
 |
Columns AR-AV have been omitted due to Course Event requirements. Alternatively the value of 0 can be used.
|
Event 3
 |
Event Name was added to column L under the other events for the same course. Since we are not using an Event template, nor is the course/event a CCCE course we omitted Columns M-P
|
 |
Since this is not a SCORM/AICC course/event we omitted columns Q-S.
Column T, or the Is Classroom Portion was given the value of ‘1’ as it is a classroom course event.
In this example we are not using Column U and V as this is a simple single session event. The Classroom date and time will be placed in a different area(Column Z and AA)
|
 |
Since this event is taking place in the EST, we will select Eastern time from the dropdown in the W column. Column X will become populated with the choice made in W.
Since this is a simple single session event, we will omit Column Y.
|
 |
For column Z, or List of Single sessions, we have placed in the date and the Start time in the following Format M/D/YYYY HH:MMTT. As the Session is taking place on July 14 at 04:00 PM, this means the value added to the column for this event is 7/14/2021 04:00PM.
For Duration(AA), we have placed the value of 120 since the duration of the session will be 2 hours.
For the First instructor column(AB), we have omitted the information as we do not know the Instructor and we did not want to add any information for the instructor
|
 |
For the Facility Room ID, we have left it blank as this session will be a virtual session which will be configured in the future(outside of the Course/Event Import Utility). Since we still want to provide information about the course event we can add text to column AE, or Adhoc Facility Room.
Min enrollment has been left blank per the event session requirements.
Max Enrollment has been set to 100
Max Waitlist Users is left blank to signify there is no Max for the waitlist.
|
 |
Registration Start and End Date, Column AI and AJ respectively, has been left blank. This will allow the user to self-register(if Enabled) at any time.
|
 |
If we were to utilize the Course Event Import utility on the same level we are adding the course and event to, we could have omitted column AN. For this example however, we are adding the Unique Level ID.
Make Course Default(AO) – We have omitted. Alternatively you can add 0 to this column. Leaving this blank or using 0, will cause the System to not default the course. Defaulting a course would ASSIGN the course to ALL users on the configured level. USE WITH CAUTION!
Make Event Default- This has been omitted for 2 reasons. First, the event session was specified to not be defaulted. Second, Classroom events cannot be defaulted.
Self-Registration Available has been configured utilizing 1. This will signify that the event will allow users to self-register into the event/course.
|
 |
Columns AR-AV have been omitted due to Course Event requirements. Alternatively the value of 0 can be used.
|
Once the template has been filled, use save or save as. Make sure to use XLS.
The Sample Template has been attached for review.
Uploading the XLS file into the Course Event Import utility
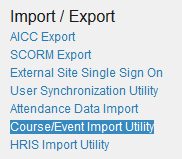
- In admin, select the System Icon
- Select Course/Event Import Utility under the Import/Export area
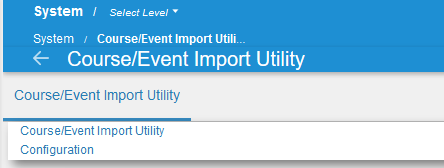
- Select Course/Event Import Utility to expand the Menu, and select Course Event/Import Utility.
- Select Browse and Select the XLS file you wish to upload.
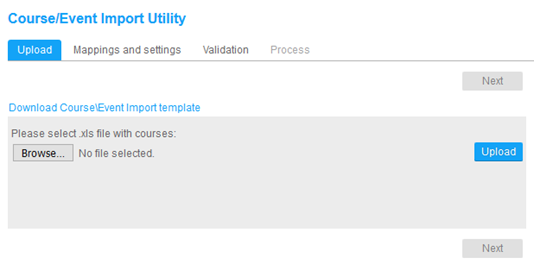
- Press Upload
- The after uploading, the utility will validate the file. In some cases, you may need to use the Mapping area to correctly match columns in the XLS file to fields or common fields that may be required for courses. Once uploaded, you should see the following information.
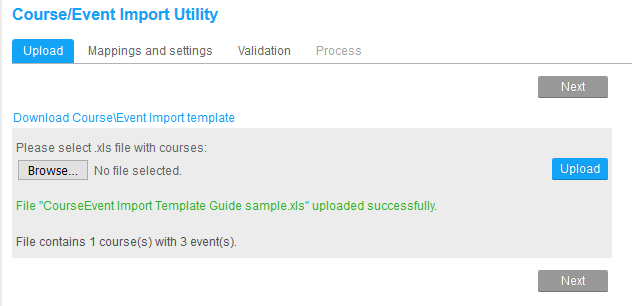
- If the information on this screen looks correct in terms of the number of courses and events, you can proceed to the mappings and settings area or go directly to the Validation tab. The Validation tab is where you will find additional information pertaining to the courses and events as well as any error information.
- Since we utilized the template from the downloads and we did not add additional columns we will proceed to the validation tab.
- In the Validation tab, you will be presented with information as to how many new courses will be added as well as new events.
